In internet SharePoint sites we need to add forms, we can build these forms using visual web-part or using InfoPath forms.
A lot of site owners ask SharePoint guys to build a site forms using InfoPath; the reason is InfoPath form is easy to update and maintain, but there is a big issue faced these engineers after go online, which is the spams.
With visual web-part it is easy to solve spam issue by adding CAPTCHA solutions like reCAPTCHA. but with InfoPath; and after search and search on the internet "how to add CAPATHA to InfoPath forms"; I found that there is no straightforward solution to solve this issue.
Then I decide to create project on Codeplex.com to help SharePoint engineers to solve this issue. And I call it Distinct CAPTCHA Web Service. By using this service we can add CAPTCHA to InfoPath forms easily.
Let’s start step by step:
We can apply this solution in InfoPath 2007, 2010 and 2013. But in this example I used InfoPath 2010.
- Download Distinct CAPTCHA Deploy Package.
- Deploy the service to your local IIS server; you can follow the steps in Distinct CAPTCHA Web Service documentation.
- Open InfoPath designer and create blank form (also you can use SharePoint list form, these steps can apply on any InfoPath from type)
- Add controls to the from:
Add Picture (As link), Textbox, and two buttons to your form.
-
Add Distinct CAPTCHA Web Service to the form:
In the Distinct CAPTCHA Web Service there are two methods one for generating image and the other to validate user input text. When form loaded we need to add the image CAPTCHA to the form; to do this go to Data tab select From SOAP web service and add the Distinct CAPTCHA Web Service as the following figures:
Do the same steps to add validate method but uncheck the automatically retrieve data when from is open in the last screen.
- Binding the CAPTCHA image:
First, right click on the picture control and select Change Binding option, second select Generate method data source, finely select ImageUrl.
- Add refresh button rule:
Select Refresh button and add new action rule to re-generate the image and token
- Validate user input:
In step number 4 we add two web service methods to the form, and in step number 6 we use the generate method, and in this step we shall use validate method. We need three actions rules to validate user input:
- Rule one: Fill validate method token query field by create set a field ‘s value action:
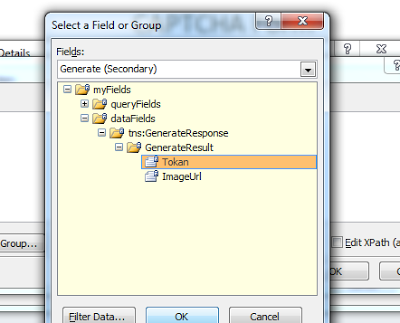
From validate method select query Token filed to set Rule Details filed
From generate method select data Token filed to set Rule Details value
After complete the steps the Rule Details should look like this:
- Rule two: Fill validate method userinput query field by create set a field ‘s value action:
From validate method select query inputText filed to set Rule Details filed
From Main select query UserInput filed to set Rule Details value
After complete the steps, the Rule Details should look like this:
- Rule three: Add new action rule to call Validate web method:
After add the previous rules, the rules box should look like the following:
- Rule one: Fill validate method token query field by create set a field ‘s value action:
- Check validate result:
After we fill the query parameters for the validate web method and call the method, we shall compare the result and deiced if the user input is correct or wrong. To do this add new action rule to compare validation result and display a message if the user input not match the CAPTCHA image.
- Congratulation! Test the form:
** You can download this example from Distinct CAPTCHA Code.


+form.png)
Thanks a lot. after a long time with searching I found your post and this saved me hours.
ReplyDeleteYour explanation are not clear and hard to follow. The code should be in bold when you refer to a button and the code i should type should be bold or something like that
ReplyDeletethanks Joseph for your comments, I'll keep in mind next post
ReplyDeleteWelcome Bill :)
ReplyDeleteAlright thanks
ReplyDeletethanks, helped a lot, great guide!
ReplyDeleteThanks alot , its working fine ,But i am facing on problem as our sharePoint is published over the internet & when i trying to access the form from outside the picture is not showing ? is it work with published form ?
ReplyDeletehi ¿anyone know if it supports Sharepoint online?
ReplyDelete